Example: Importing a CSV file to Salesforce
In this example, we will use Boomi Integration to sync new customer contact data from a local CSV file to Salesforce. We will configure the following:
- Disk connector (Start step)
- Flat File profile
- Map step
- Salesforce connector
![]()
Prerequisites
Before you begin, you will need the following:
- Salesforce credentials (user name, password, and security token)
- Local basic runtime installed
- CSV file saved as
customers.csvin the/data/folder located in the basic runtime directory
You can use the following example data for the CSV file:
FirstName,LastName,Email,Phone
John,Doe,john.doe@example.com,555-123-4958
Jane,Doe,jane.doe@example.com,555-329-2738
Walter,White,walter.white@example.com,555-148-9274
John,Watson,john.watson@example.com,555-299-4983
Sherlock,Holmes,sherlock.holmes@example.com,555-812-2332
Step 1: Configure the Start step
Log in to the Boomi Enterprise Platform and click Integration from the Welcome page. Then click Create a New Process. The Build canvas opens with a Start step already placed and the configuration panel open.
-
Enter a display name (optional) and select Disk v2 for the connector.
-
Create a new connection by clicking the plus icon in the Connection field.
-
Configure the following:
a. (Optional) Enter a name for the connection.
b. For the directory, enter
data/.c. (Optional) Enter a polling interval in milliseconds. This specifies how often the connector's Listen operation polls the file system to retrieve batches of events. The default value is 10000 ms.
-
Click Save & Close to return to the Start step.
-
For Action, select QUERY from the dropdown menu.
-
Create a new operation by clicking the plus icon in the Operation field.
-
Configure the following:
a. (Optional) Enter a name for the operation.
b. Click Import Operation and select the runtime that you installed in the prerequisites.
c. For the Object Type, select File, and click Next.
d. Select the
fileName EQUALS ?filter, and then click Finish. -
Click Save & Close to return to the Start step.
-
In the Parameters tab, click the plus icon to add a parameter and configure the following:
a. Input: fileName:EQUALS
b. Type: Static
c. Static Value: customers.csv
-
Click OK to return to the canvas.
-
Enter a name for the process, such as
ImportCustomersToSalesforceand click Save.
Be sure to save your process frequently!
Step 2: Create a flat file profile
Next, we need to create a flat file profile to map the elements of the CSV file to a format that we can use with the Salesforce connector. For this example, the CSV file has a header row and usees commas to separate data.
-
On the Build canvas, click Create New from the side bar and select Flat File Profile. Then click Create.
-
On the Options tab, select the Use Column Headers checkbox.
-
For the File Delimiter select Comma Delimited.
-
On the Data Elements tab, click Record and enter a name, such as “CustomerRecord”.
-
Click the arrow next to Elements to add a new element. We will add an element for each column of data in the CSV file. Configure each element as follows:
Data Name Mandatory Field Length Validation Min Length Max Length Data Type FirstName 
1 50 Character LastName 1 50 Character Email 1 100 Character Phone 1 20 Character -
Click Save & Close to return to the canvas.
Step 3: Configure the Salesforce connector
Add the Salesforce connector to the canvas by searching in the steps palette and dragging the connector to the canvas.
-
Create a new Salesforce connection by clicking the plus icon.
-
(Optional) Enter a name for the connection.
-
Keep the default URL of
https://login.salesforce.com/services/Soap/u/39.0 -
For the User Name, enter your Salesforce username.
-
For the Password, use your password + the security token provided by Salesforce. For example, if your password is
password1and security token isabc123efg, enterpassword1acb123efg. Do not include any spaces.For more information about how to enter the password, refer to Replacing your Salesforce password with a password and security token
tipAppend the security token to your password in a text file and format it as plain text to ensure that no extra characters are included when you paste it into the Salesforce connection field.
-
Click Save & Close.
-
Choose Send for the Action.
-
Create a new Salesforce operation by clicking the plus icon.
-
Click Import Operation.
-
Choose the connection we created in steps 1-6 and then click Next.
-
For Object Type, select Contact.
-
For Action, choose Create. Check the box to skip importing the parent/child hierarchy, then click Next.
-
After the operation has loaded, click Finish.
In the Request Profile field, you will see the profile that we will use in Step 4 to configure the map. In this example, this profile is called “SF_Contact_CREATE_Request”.
-
Click Save & Close.
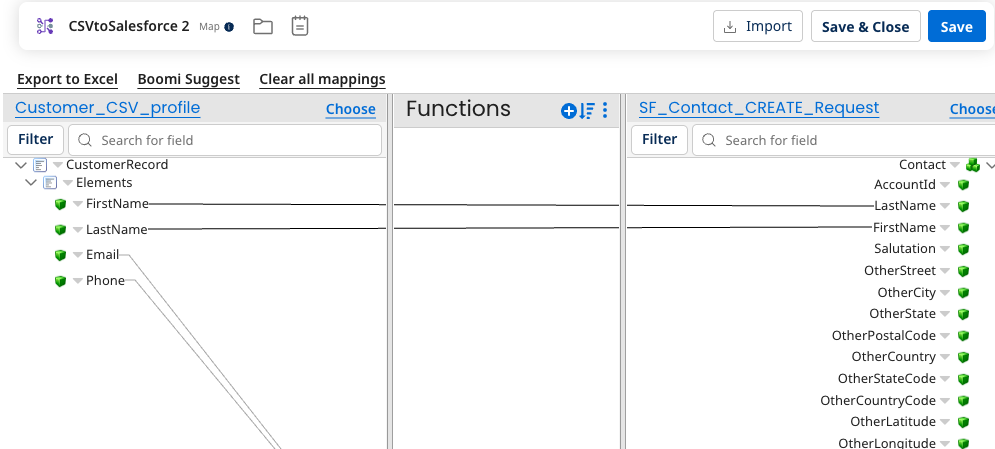
Step 4: Configure the Map step
Add a Map step to the canvas by searching in the steps palette and then dragging it to the canvas.
-
(Optional) Enter a display name for the step.
-
Create a new map by clicking the plus icon.
-
Enter a name for the map. For this example, the map is named “CSVtoSalesforce”.
-
For the Source profile, choose the flat file profile we created in Step 2, Customer_CSV_profile.
-
For the Destination profile, choose the profile that was generated when we configured the Salesforce connector. For this example, the profile is called SF_Contact_CREATE_Request.
-
Map the elements from the source to the destination by clicking the source element and dragging it to the matching destination element.
-
Click Save & Close.
-
Click OK to return to the canvas.
Connect and test the process
At this point, we have configured the Start step as a Disk v2 connector, created a flat file profile, and added and configured a Map step and Salesforce connector.
Connect the process steps by clicking the arrow next to the step and dragging it to the next step or connector. Then, add a Stop step to the end of the process. The order should be Start - Disk v2 --> Map (CSV to Flat File) --> Salesforce --> Stop.
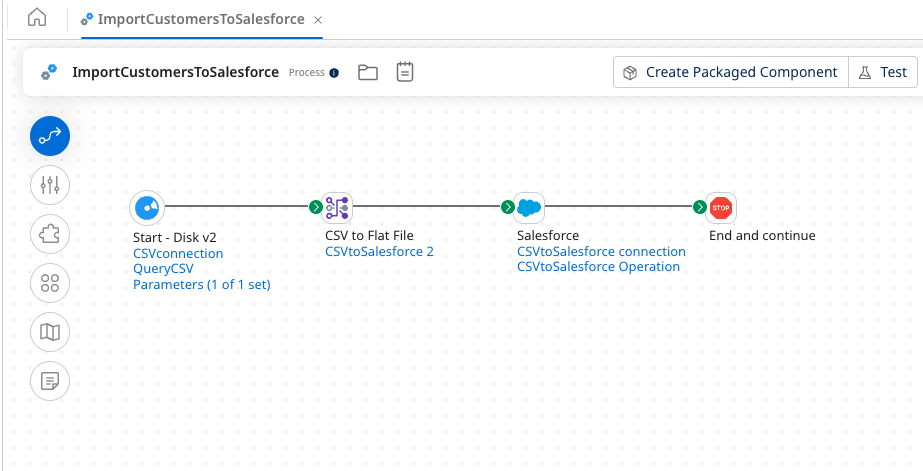
Click Save to save the process. You can clean up the canvas by clicking the Arrange icon, which automatically aligns the steps.
Next, let’s test the process. Click Test on the Build canvas and select the runtime you installed in the prerequisites. Then click OK.
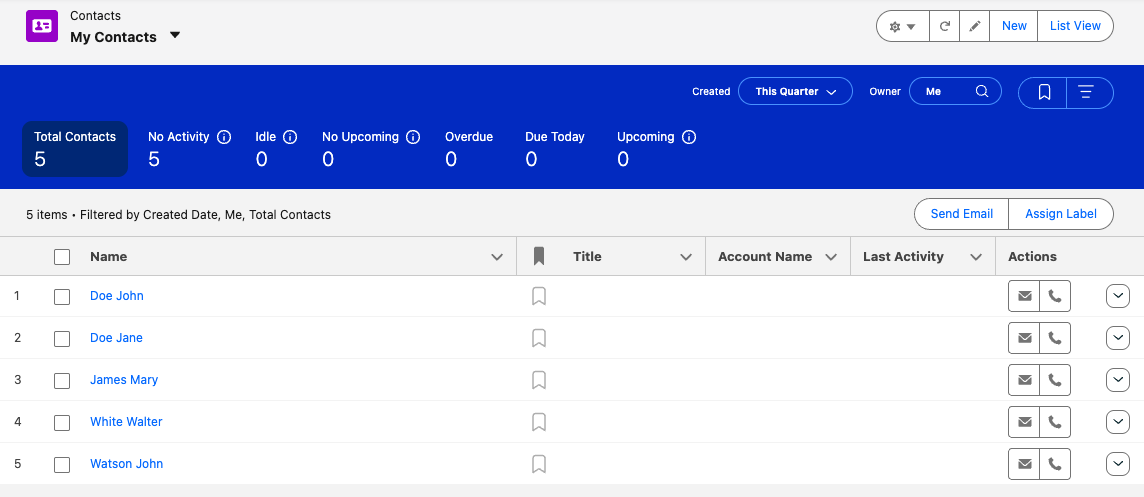
The process should complete successfully. You can click the Start step and the Salesforce connector to see the documents generated through the process.
In your Salesforce account, under Contacts, you should see the new contacts that were previously in the CSV file.
Next steps
After testing your process, you can package and deploy it. For more information, refer to the following topics:
